

Here at Press Loft, we see on a daily basis how much of an impact having great product images can make to a brand’s press coverage results. You may have the most beautiful product on the planet, but if you don’t have top quality, high-resolution images of your product, ready to send to journalists for their articles, your chances of securing many press features are sadly slim.
This doesn’t mean you have to spend big bucks to get professional results, though. If you’re keen to have a go at your own product photography we have a few tips and clever DIY tricks of the trade to share with you, which will save you money on equipment too!
First thing’s first – ditch the artificial lighting
We often receive questions from clients asking what lighting equipment they should look to buy when shooting their own products, and there are lots of different approaches to take when shooting product at home, but the one we’ve found to be the easiest and most consistent is by using ONLY natural light and some white card to bounce light into shadowy places. Artificial lighting can often look quite harsh and, well, artificial. You can’t beat the softness and tone of natural light.
So turn off all of your indoor lights, find a nice spot inside next to a window with good natural light. You don’t want any harsh direct sunlight coming in, just a nice soft light. If need be you could even diffuse light by hanging a sheet over the window.
Set your product upside – on to a window
Set yourself up on a table next to the window, with your product facing side-on to the window. You don’t want to photograph with light coming behind or in front of the product, side on is always best.
Create a bounce card
You’ll notice one side of your product is darker than the other and the position is creating shadows in the shot. Use a piece of white card or foam core and sit this to the side of your product, opposite the window, this will help to bounce the light back in and you’ll notice a big change when taking photos.
Create a backdrop
You can either use a large piece of card and tape to a wall or box behind the product, and to the front of your table, to create a seamless scoop effect, or get creative with different backdrops if you’re wanting to style a little vignette. There are loads of low-cost options like wood panels from your hardware store, wallpaper with faux brick or cement effects, coloured card, stacked bricks etc.
Here is how your set up should be looking:
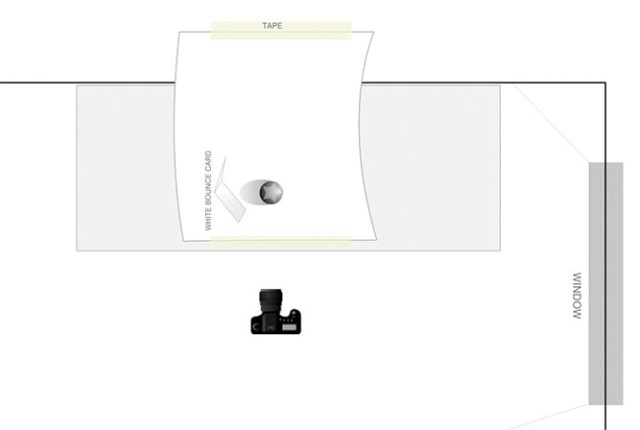
Now set your camera up on a tripod or a sturdy spot which will prevent movement in the camera. This way you can set your aperture right down and make the shot nice and bright, without worrying about the shot being out of focus due to movement.
Our friends at Shopify have put together a brilliant video on YouTube which explains this process step by step for you:
For PR purposes we highly recommend you consider looking at getting your images cut out from their background after you’ve taken your shots. For more info about Cut Out images and online resources that will cut them out for you check out our previous blog post here.
Just remember, journalist requires images which are high resolution and large files so that they are suitable for print. As a guide we recommend keeping with the below requirements so take a few test pics from your camera, upload them to a computer and open in Photoshop (or try the free tool GIMP if you don’t have photoshop) and check the image size is going to be suitable before you spend lots of time taking photos which may be too small!
Recommended image size for journalists:
- JPEG
- 300dpi
- At least 10 x 10cm
- At least 1MB
We hope these pointers have been helpful for you!
For more PR tips and ideas check out some of our other posts:
Tips for styling a great flat lay photo


